.png?height=120&name=k12-4%20(2).png)
Edit the calendar and bell schedule in the 8301 IP Paging Adapter & Scheduler.
Set Up Bell Schedule
- Log in to the Paging Adapter & Scheduler by typing the IP address provided by K12 MT into the the web browser. You will need to be on the school internet network to access it.
- The User Name should be Scheduler and K12 MT will provide you with a unique password.
- Navigate to the Scheduler Tab at the top.
- Go to Schedules
- Click Create Schedule
- Enter the Name of the Schedule in the text box. (e.g. Weekday or ACT Testing Day)
- Click Add Event
- Enter the Event Description (e.g. Period 1 Begins, Lunch, or Period 3 Ends)
- Enter in the time you want the bell to sound (it will automatically change it to military time after you log out.)
- Select what Audio you want for that event. (e.g. School Bell.wav or any pre-recorded announcements such as the pledge)
- Select All Call on the Page Zone or set a specific zone as needed .
- Once you have your completed schedule click Save.
- To delete an Event, click on the blue X button on the right hand side.
- To copy an Event, click on the blue double page button on the right hand side.

Set Up Calendar Schedule
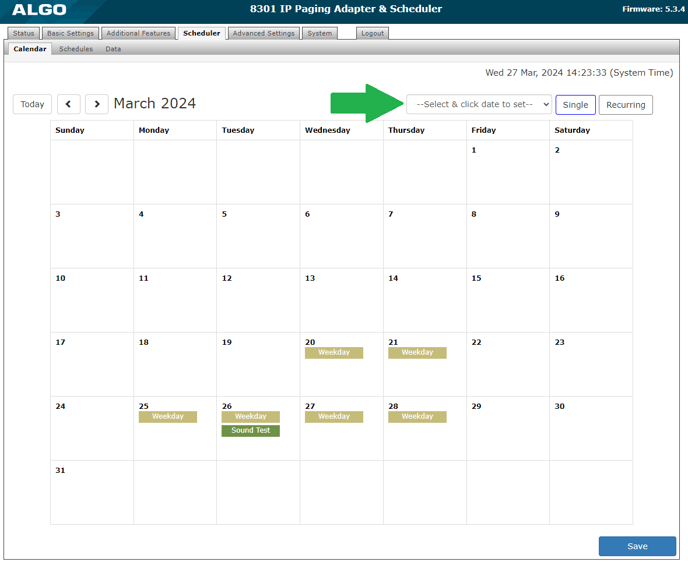
- Navigate to the Calendar Tab
- Click on the --Select & Click date to set-- drop down on the top right.
- Select the Schedule you want to add to the calendar (Weekday or ACT Testing Day...)
- Make sure Single is selected.
- Click the day/days on the Calendar that you want to implement the schedule.
- Once you have your calendar filled in, click Save.
You can have more than one schedule in a day if you choose.
- To REMOVE a schedule, go to --Select & Click date to set-- drop down and select and select None (clear).
- Then click on the schedule you want removed on the calendar. It will disappear.
- Then Click Save.
Set A Recurring Schedule
The ‘All Weekdays’ or ‘All’ buttons can be used instead of clicking individual dates to implement a specific schedule throughout the month or to clear existing schedule for the whole month.
The schedule will need to be applied to each month separately.
Recurrent schedules are also supported.
- Select the desired schedule from the --Select & Click date to set-- drop-down menu
- Select "Recurring" from the button on the top right.
- Once selected, configure the recurrency settings underneath the calendar.
- To apply, click on the starting day on the calendar. The schedule will now be populated onto the calendar.
- Save the settings.
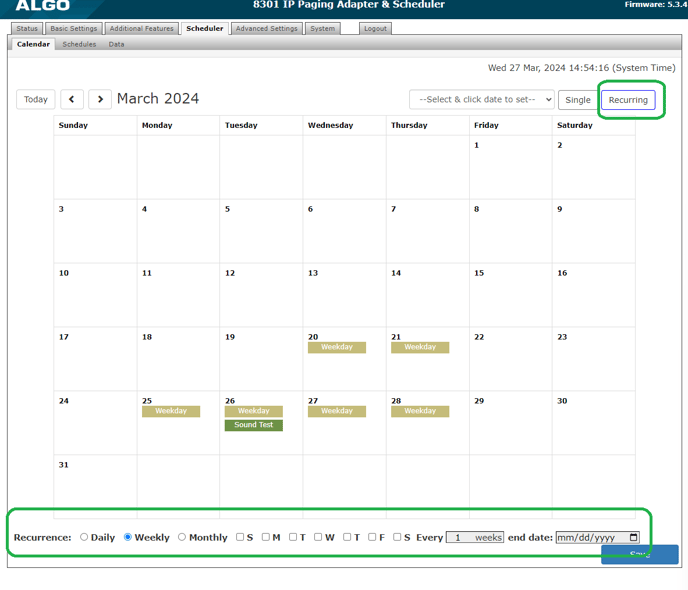
Note: If you want to delete one day's schedule that was created by a recurring schedule, it will delete all of that month's/week's schedule.